Adventures in time and space

In 2016 I made a small web app to help me calculate the ideal values for reverbs and delay, as I constantly found myself doing the math (which I never could remember anyway) by hand, just to be sure that the decay on the snare drum wasn’t messing things up, or to make sure the pre-delay wouldn’t become a post-delay at some point.

I just gotta say it hasn’t aged very well (but in the greater perspective – who has?). Although a bit sloppy looking, it still works, and that was the point anyway. I had actually forgotten all about it until recently.

The reason why I didn’t make a Swift version for iOS/iPad initially, was simply that it would require that I had my smart phone or iPad with me to every studio session, which would be pointless and counter-productive for me, so I figured that I probably could throw something together with javascript and old school HTML. And so I did.


Flic 2 + SoundBrenner = ❤︎

I got myself a Soundbrenner Core watch recently, and I gotta say: it grows on you! I figured it was a good idea since I always use a lot of time looking for a guitar tuner or a metronome anyway, and this way I always have that on me, even if I don’t have my phone within reach. 

When I learned that it could sync via Bluetooth and midi MTC, I was sold…or bought actually, depending on how you see it. However, this article was not intended to cover the philosofical aspects of modern capitalism, so I’m not going to elaborate that further. Anyway, I’m a sucker for good gadgets, and especially if they’re designed for creating music or music production.

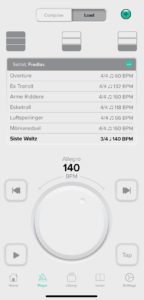
The real power of Soundbrenner comes into play when exploring the more advanced features, like adding songs to the user “library”, and further creating “setlists” from the song library. Very handy, and the user interface is easy like sunday morning.

Loading a setlist in the Soundbrenner iOS app

When I started to explore the app settings, I noticed the “Bluetooth Pedal” functionality. Aha! An imaginary dim yellow lightbulb immidiately went on above my head, accompanied by a Looney Tunes stock sound effect. 💡

Although I didn’t have a bluetooth pedal, I did have lots of Flic 2™ Bluetooth smart buttons lying around which probably could be customized to suit my needs?

It turned out that my assumptions were indeed right, and I find it very convenient to use my Flic 2 “pedal” (not bad considering it’s not even a pedal at all) as a supplement tool for the “tap tempo” and start/stop in particular. It’s actually one of the more useful “hacks” I ever found. So how did I do it? Keep reading, padawan.

How to make Flic 2 and Soundbrenner talk

The Soundbrenner metronome app will automagically discover Bluetooth devices sending out these keystrokes
  • Open the Flic app on iOS (I don’t have an Android device, but I suppose it’s pretty straight forward there as well).
  • Add/pair a new Flic 2 button, or select one that you already added.
  • From the list of providers, select the “Flic Universal” category, and “Keyboard” in the device sub category list.
  • From the list of keyboard actions, add the following:
    • Up Arrow
    • Down Arrow
    • Enter/Return
    • Space bar
  • When you press “Save”, you will receive a warning that the connection will be lost. This is normal and expected behavior, since the Flic button will now be “discoverable” as a new bluetooth keyboard/pedal device.
  • Wait a couple of seconds, and open the Bluetooth category in iOS Settings. Tap the “new” Flic bluetooth device to pair it.
  • Now, open the Soundbrenner metronome app. In the app settings, select “Foot Pedal Inputs”, and enable it (see screenshot).
  • Then proceed to map the key functions to their Flic 2 counterparts that you just added. For starters, map “Up Arrow” to “Tap Tempo”.
  • Now, select the “Player” section at the bottom menu in Soundbrenner, and keep pressing the Flic 2 button at a steady pace. The tempo should now respond to the tempo you tap on the Flic 2 (and congratulations, you just disguised your Flic 2 as a foot pedal). Proceed to map the other key functions as well.
Mapping the Flic 2 button clicks to Soundbrenner functions

Note

If it stops working after a while, just press the Flic 2 button a couple of times to re-establish the Bluetooth connection. You could also try to open the button settings in the Flic app, and change the button properties from “Passive” to “Active”. Keep in mind that this will use some extra battery on the Flic button, but I find it more reliable for this particular use.

Keep tapping, and #masteryourcraft! ❤️


A more audible click track

Ever wondered how to change the metronome in Logic Pro X to a more sensible and audible one? Here´s a tip to stop that Klopfgeist from haunting your projects:

  1. Clone these settings in Project Settings – Metronome (the Midi click settings on the right is NOT necessary, it´s the key settings on the left that are important).
    Metronome settings in Logic Pro X
  2. I made a ready-to-go channel strip setting you can download.  Copy the file to your desktop, open Finder, press ⇧⌘ + g and paste:
    ~/Music/Audio Music Apps/Channel Strip Settings/Instrument
  3. Now drag the file from your desktop to the above folder.
  4. (Re)start Logic. In a project, open the mixer, choose to view ALL tracks
    Mixer view
  5. Select the channel strip named “Click”. Press “Setting”, and you should be able to see my custom metronome template called Metronome. Click it.
  6. Press R to test it. You´re welcome.
  

The times, they are a cha-a-nging (so keep up the pace)

Remember Porta Studios? 8-tracks? Beta video players? Sega? Vinyl records?

If you answered “no” or “what??” to at least one of the above questions, you are most likely younger than 18, not into those kind of things, or you are more interested in what´s going on in the present, than what happened down in memory lane. Either way, you´re perfectly normal (and not anything like me).

My point with this somewhat confusing nostalgic intro survey, is that things change, fast. 50 years ago we recorded music on tape machines larger than your Macbook Pro, one guy just to operate it, and 10 other guys to mix, master, cut & splice the tape, place microphones, bounce the recording and keep track of takes and edits, and of course a producer/exec.

4 or 8 tracks was the max limit, bear that in mind when listening to Sergeant Pepper or Pet Sounds the next time, and you´ll a) feel like a complete moron for using 24 tracks on the guitars alone and still not get a decent take, b) realize what brilliant geniuses those 50s/60s pioneers were. In 2015, in theory at least, you can record a double album in three days, mix and master, and finally distribute it to Spotify and iTunes, from your bedroom – with only a computer, a sound card, a midi keyboard and a decent microphone. One man show.

Still I think we have lost something on the way. The endless choices and possibilites are working against us. Want a 808 or 909? A Ludwig or a Gretch? 24″ or 26″ kick drum? Click, click – there ya go. Can´t play the drums? No prob Bob, we just drag in a loop, or quantize like a madman until it sounds GREAT. Can´t sing either? We have remedies for that, what kind of Autotune do you want?

Sigh.

Back in the days your drummer HAD to be good enough to keep time and groove, and you HAD to know how to place those mics (let alone what kind of mics, and how to make them sound OK). This was not going to be a “things were so much better before” article, but I realize I have to bring up these examples to make my point: You can´t fake skills, and you gotta know HOW to make technology work for you, instead of against you.

You don´t need a mic technician or a John Bonham-clone to make a hip hop album – but you will need at least a proficient rapper and a good producer to make it fly like Dr. Dre. You can´t make your band sound like Zeppelin if you compensate the novice drummer with adding midi loops or quantize it until it sounds like a drum machine from the 80s.

You simply can´t beat skills and hard work, and most importantly; there are no shortcuts. I´m sure Kenny Rogers will agree.

You gotta know when to hold´em, know when to fold´em.

Kenny Rogers, “The Gambler”

Quotes aside; you won´t find Kenny Rogers in my record collection, or in any collection of mine for that matter. Just so we have that clear (nothing personal of course, just not my cup of…something).

I love technology, I love possibilities and gadgets, but I try to find the best use for what I have available at the time, and I don´t expect that autotune to ultimately make that horrid singer sound just right. Got my point? Good.

One last advice. Software will also change, all the time. Synths and midi have come a long way since 1984. My advice: When you are satisfied with your software instrument midi recording, bounce it. The audio will most likely play just fine 10 years from now, the midi is less likely to cooperate and sound just like you played it (unless you make regular backups of your software and store it for decades).

And keep those midi tracks anyway, it will probably come in handy, and when you archive it – name the midi track (or write it in the track notes in Logic Pro X) with as much info as you can about the original software instrument and eventual preset name.

Example: “XLN Audio – Addictive Drums 2 – Fairfax vol. 2 – Almost dry – V-drums midi mapping”.  When you try to import your project, a zillion years from now in Logic Pro XIII, you have a fair chance to recreate the sound because you know the name of the manufacturer, SW instrument, version and preset name.

Andreas.


Workflow: Naming of your Logic Pro X content

One essential factor to having a good workflow in Logic Pro X is naming your tracks, regions, clips, patches and channel strip settings. It might not seem like such a big deal, but when you´re looking for a specific track comp while editing, and all you can find is dozens of “copy of <project name>036.bip.bip.aif” and similar, you will see my point. Beep beep.

Name your tracks and audio files, or get beeped (says Coyote)

Thankfully, there are key commands for making this a bit easier to maintain. Here´s the lowdown, with default key commands (you can customize this to your hearts content in Logic Pro X – Key Commands – Edit):

[code]

⇧ + ENTER: (Re)name Track

⇧ + n: (Re)name Region (select region first)

⇧ + t: (Re)name Take or Comp

⌥ ⇧ + n: Name regions by track name (I use this quite a lot)

⌥ ⇧ ⌘ + n : Name track by region name

⇧ + ´: (Re)name Marker

[/code]


You can also assign a custom key command for “Rename Project”, although I recommend to use the “Save as…” option.


How to organize large Logic Pro X projects

If you´re working on a Logic project with lots of tracks, things can get chaotic before you know it. However, there are ways to maintain control of that Frankenstein monster that started out as a 3 piece acoustic ballad:

Give it a name

  1. Name every track when you create them. The guitarist can wait 5 seconds (although he´ll try to convince you otherwise). You will thank yourself later on.
  2. People have different methods to accomplish the same thing. Personally, I use strictly capital letters to name audio tracks, regular ones for Midi/Software instruments. Find out what works for you.

    When in doubt, take the bus

  3. Track stacks are the Logic equivalent to IKEA storage boxes, only cooler. For example: Select all the drum tracks in the mixer window, then press⌘ ⇧ + D or Tracks – Create Track stack, choose Summing when asked. Now all
Track stack example
Create track stacks to quickly separate your instrument groups. If you already have routed your buses, they will automatically be converted to track stacks, with all your bus plugins.

your drum tracks are inside the track folder, and in effect you just routed your tracks to a bus. Repeat this process for the other instrument groups.

  • Now you can just “close” the drums track stack when you want to focus on – say, the guitars. Press the small triangle Open/Close Track stackto close a track stack, press it again to open.This way, you´ll get a tidy track area/mixer without hiding tracks (more about that later), you´ll get a bus fader for each of your instrument groups, and you have the mixer area organized without any hassle at all. Besides, summing (bus) mixing is the only way to go if you have more than a couple of tracks in your project. The last time I had a project with 4 tracks or less was in 1992 or something, but then again my trademark is a wall of guitars and Spector-esque soundscapes.
    Another great thing about summing track stacks, is the option to use plugins on the track stack channel strip. Let´s go back to my allegory: A track stack is basically a storage box where you keep your tracks neat and sorted from each other (drum tracks in one box, vocal tracks in another and so on). Those of you who started out with LP9 or earlier, already know that you will get the exact same result mixwise (if that´s a word) if you create one bus channel for each instrument group. Track stacks is just Logic´s way of making bus mixing understandable, in a straightforward and orderly way.


  • Magic markers Markers is a great way to get an overview of your project. Coloring the markers can be a valuable visual aid, espescially for session musicians and drummers.
    Magic markers
    Markers is a great way to get an overview of your project. Coloring the markers can be a valuable visual aid, espescially for session musicians/drummers, since it is viewable from a longer distance.
  • C is for Color

    You can color just about everything in Logic Pro X. Press ⌥ + C and a color palette appears. Open the mixer window. Select a channel strip, and proceed to select a color in the palette. Voilá, the channel strip changes color. You can color regions, track notes, tracks in the track area, Markers and clips the same way.

    Example

    If I have 4 guitar tracks, 10 drum tracks and 2 vocal tracks, I can select the drum tracks in the mixer (select the 1st drum track, press ⇧shift and keep it pressed, then select the 10th track and release shift). Now  that you have selected all the drum tracks (which of course resides in perfect order in its track stack :-), you can summon the color palette again and select a color. Select a bright Green or red color, and you will never have to assemble a search party to look for that missing snare drum track again, I assure you.

    • Get some fresh air at least once every hour, and do a reality check regarding your production. Do you really need that extra ukulele? The mellotron which sounded great on its own, but drowned in the orchestra? Not everyone is a minimalist, that´s cool, but try to keep the tracks down to the ones that serves your initial plan. If you change your plan, just stop for a minute and try to write it down, or at the very least – be concious and aware of it. This calls for a Alice in Wonderland quote:

    “Alice asked the Cheshire Cat, who was sitting in a tree, “What road do I take?”
    The cat asked, “Where do you want to go?”
    “I don’t know,” Alice answered.
    “Then,” said the cat, “it really doesn’t matter, does it?”

    Experimenting is also cool, but take it for what it is, and try to remember your steps for later. There will always come a time when you “really need” that guitar sound you spent hours experimenting your way into ages ago – which brings me to the last point:

    Save your settings!

    Every plugin has a save option. Every channel strip in the mixer has a  “Save channel strip settings” option. Click the Settings button on the channel strip in the mixer to access it. There is of course a corresponding “Load channel strip settings” at the same location. You can even save full track stacks with all your plugin settings, in just a couple of steps:

    • Select a track stack in the track area (select the “parent track”), bring up the patches library (from the button on the left on the main toolbar, or double click on left boundary of the main window. You can even assign a custom key command to toggle the library)
    • Press the Save button in the bottom left corner of the library. Make sure you don´t have the “hide file extension” option checked, just in case. Logic doesn´t play well with files it can´t recognize.
    • To load the patch from another project, create a new empty software instrument track, select it, then open the library and choose your saved patch from the “User patches” category. Boom – ye ole track stack is back. You can make your own folder structure within the “User patches” folder, but we´ll  deal with that some other time.

    It sure is faster (and less tedious) than eq´ing all those drums tracks from scratch every time, or tweaking endless layers of synth sounds for that matter. Saving your patches and custom setups regularely will save you days, even weeks of work in the end.


    Ready, Set – Blog!

    Welcome to my humble music blog among millions of other blogs. My argument for not making this blog earlier has always been “There´s plenty of people out there doing it already, why bother”, but then again – every day someone is asking me about something related to music production, and in most cases their reply is something like “Wow! This will save me lots of time, I wish I knew about this earlier”.

    So I decided to give it a go, and share the quirks, the in and outs, the great hidden stuff, the not so great bugs, the workflows, the workarounds, the tiny knitbits that make you go “oooh!”, and probably lots of the stuff you already know – but if there is one thing I learned in these 25 or so years that I worked with music: There is always someone who´s in the dark, just waiting for that magical key that will unlock their hidden powers. 

    I´m not a wizard, and I do not possess any superpowers in that regard. But for me, the magic of teaching and learning can be summed up like this:

    Knowledge is power. If some information seems unimportant to me, it´s most likely very important to someone else. We´re all at different paths, and the more aware you are of others, the more you learn yourself.

    What on earth does this have to do with music production, you might (rightfully) ask. Well, nothing and everything. Firstly, it´s the argument that convinced me to start this blog. Secondly, you WILL be a better producer if you pay attention to how your production is perceived/received by your audience. All music have a message (yes, even instrumentals), the composer and the producer are the people who are mainly influencing how the message will be received by the listener.

    Again: Be aware of the message, how you want it delivered, and who your target audience is. There are many great functions in computer software, but in my opinion they are all useless if you are writing and producing like a robot (in fact, the minimum requirements on the box should be a working connection between the head and the heart).

    This was my opening rant. Now I will try to keep it simple: One short production advice every day. This blog is supposed to be mainly Logic Pro X-related, so expect a great deal of that, but I´ll also post some general production tips (and nerdy stuff about patching and gadgets, due to my geeky nature).  We´re rolling!

    Andreas